Search The Web

Saturday, August 27, 2011

How to Develop a Personal Painting Style

Most artists have an identifiable style. It is that  kind of style that enables the viewer to recognize that the painting is done by you. How do you develop this? Is it something you automatically have? And how do you develop your own style?

Basically, it is something that you do not develop over night and over time; and something you don't acquire in art classes. It will come as you go along painting after painting. My brother had the greatest influence in my art life. When I was just learning, I used to think of the possibilities of acquiring his style in which, of course, I would not want to happen. I so want to have my own style, something that people would recognize me for. That thought kept on my mind as I continue painting. His paintings were my inspiration even up to this day. I still am not sure if I already have developed that distinctive style in my paintings. Unconsciously or consciously, I think, people would somehow develop his own style. But one thing is certain, galleries like to see a distinctive style of an artist - whatever sort for that matter.

One thing to remember though about style, it need not be a life long commitment. You can change it any time and you will be surprised to find out that it can evolve. I guess, most aspiring artists are struggling with the concept of having his or her own personal style. But please do not get me wrong. There is really nothing wrong with being influenced by another artist's work or even by trying to copy other art works. It is but a learning process for everyone. You learn by doing and perfect your craft by practicing. 

I read somewhere that personal style is the extension of your personality. I pondered on it a great deal and somehow found truth in it. It makes sense that a personal style is a combination of choices. Refining your choices can help you create something unique in your own way. 

If you are an aspiring artist or just starting to learn, just go ahead and not focus on what style you should develop. Do keep practicing. Do not stop. Enjoy every sketches and strokes you make. Listen to your canvas, get the feel of it and you will be surprised to find as you go along that you may already have developed your own unique style.

Something You Should Do As An Aspiring Artist

  • Acquaint yourself with art history. Learn about the different styles done by famous artists.Study their lives and influences. 
  • Visit museums when you can or you can browse the internet for famous art works. Read what the painting expresses. Study the subject materials, colors, employed techniques and other details that may help you determine the artist's message.
  • Tap all methods of painting by experimenting for self-growth.
  • Experiment with materials, techniques and subjects. You need not limit yourself with the norm. 
  • Evaluate your work and be your own critic. Improve from there.

Art Styles


Expressionism Art

Expressionism is an artistic style wherein an artist attempts to show subjective emotions and responses to objects and events that interest him. This is depicted by distortion, exaggeration, primitivism, and fantasy. 

This style is not governed by a rigid set of pre-existing rules. The colors used in expressionism art are often intense or violent. The exaggeration in colors display an intense emotional expression of the artist. The colors didn't have to be realistic but rather of a symbolic value largely determined by individual artist.

Kandinsky is widely quoted as saying: "The artist must train not only his eye but also his soul, so that it can weigh colors on its own scale and thus become a determinant in artistic creation". 

An Example of Expressionism Art Work


Starry Night by Vincent Van Gogh

Starry Night is one of the most well known art works in the world. One of the features of this painting is the night sky filled with swirling clouds, stars ablaze with their own luminescence, and the bright crescent moon.  The painting shows much exaggeration but the subject is something that we can all relate to. 


Blue Horse by Franz Marc

Franz Marc, a German Expressionist artist, believed that colors had a vocabulary of emotional keys. This is one tool that he used to raise his art to a higher spiritual plane and the other was his choice of the subject.


The Scream by Edvard Munch


Edvard Munch (pronounced Muenk) was a Norwegian painter whose psychological and emotional themes were a major influence on the development of German Expressionism in the early 20th century. The scream was regarded as an icon of the existential anguish of the post-industrial modern age.

Paint Like an Expressionist

If you think you are more comfortable with this style, you can start by letting your subject matter determine the colors for you to select. Go with your instinct. To start with, limit your selection of colors to five - a light, medium, dark, and two tones in between. Paint according to tone and not by hue. You can start adding complementary colors if you want more. Use the paints straight from the tube, unmixed. 


Tips and Techniques

Pick a subject. You can use anything around you like bottle caps, glass, tumblers, cups, etc and incorporate them.

Gather your art materials and prepare your work space.You can vary your application tools from the traditional paint brushes to sticks, knives, strings or other applicators you can think of.

Plan your image and start painting. In the planning stage, determine ahead of time the materials you will use and what image you would want to convey to your viewers and the color combinations. 

It is important to take note that not everyone will appreciate your art. Do not be discouraged but rather continue to paint for your own enjoyment and self satisfaction.


Sunday, August 14, 2011

Cubism Art

Cubism style of painting was pioneered by Pablo Picasso and Georges Braque in 1907 in which the subject matter was reassembled in abstract form with the concept of depicting an object as seen from different viewpoints and by using an analytical approach and painting the basic geometric shapes, sometimes showing multiple viewpoints of a particular image.

Characteristics of Cubism
  • Analytical Cubism - shows various perspectives, angles and views of the object. This is a structured dissection of the subject resulting in a fragmentary image of multiple viewpoints and overlapping planes. The most distinguished feature is its simplified palette of colors so the viewer wouldn't be distracted from the structure of the form.
  • Synthetic Cubism - is an approach where mixed media and collage were used. The use of fragments or cuttings from newspapers, sheet music, pieces of cloth, playing card, cigarette packs interacted on the flat plane of the canvas to achieve a total interpenetration of life and art.


An example of Analytical Cubism
Glass on a Table by Georges Braque 1909 - 10


An example of Synthetic Cubism
Still Life with Compote and Glass by Pablo Picasso


To most viewers, Cubism is a bit disturbing. However, its unique approach to art and life is also fascinating and refreshing. Modern materials are being used rather than the traditional paint on canvas thing. Perhaps this was a response to the modern environment. The major theme for most modern artists is the process of exploring  the fundamental energy of life.


Saturday, August 13, 2011

Abstract Art


Abstract is an art composition that expresses a certain degree of independence by an artist. It creates an illusion of visible reality. Its representation can be slight, partial or complete; depending, of course, on the artist. In abstract painting, an artist do not have to show recognizable subjects as they appear in the real world. Colors and shapes are used to depict emotions.

Understanding and appreciating this type of art is quite difficult for many people. Indeed, it often gives you a vague idea of what you are actually seeing in an art work.

In general, there are two types of abstract paintings.
  • Objects that have been abstracted from nature. The subject may not look realistic but representation is close enough to give you an idea of what you are looking at.
  •  Objects that do not reflect any form of conventional reality. You see shapes, colors, lines, patterns , and so on. Meaning, nothing is recognizable.

To truly appeciate a work of art, one must look at it with not just a single isolated creation but with its context. Every painting is done within a particular environment.  Thus, the one reason why it is important to learn something about the life and culture of a painter to truly appreciate what the artist has to offer. Of course, the quality of painting depends also on the skill of the artist.

Potential Subjects For An Abstract Painting

There are a lot of inspiration that is potential for an abstract painting. However, you must change the way you look at the world around you.  See the big picture beyond the details and focus on the shapes and patterns instead rather than on the actual objects.

As a starting point for creating an abstract painting, it is always easier to use something real and develop it from there. It is much easier this way than creating an idea from nothing.

You can start painting from a photo and focus on the shapes and patterns of the subject. Simplify down the elements and try to alternate the colors. You need not paint the whole photo but focus yourself on a small part and enrich it with lines and colors.

Here are some abstract art works of famous painters:


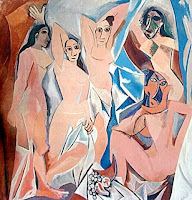
The Ladies of Avignon by Pablo Picasso   

Still Life with a Ginger Jar and Eggplants by Paul Cezanne

Mont Sainte-Victoria by Paul Cezanne

Self Portrait by Van Gogh

These paintings of famous people were all rendered in Abstract and were opposed to actual depiction. The overall composition were clearly representational and the own expression of each artist. You can also do this by focusing and playing on colors, shapes, patterns; depending on the theme of your painting or how you would want to express yourself.


Saturday, August 6, 2011

Basic Oil Painting Techniques


Impasto Painting by Van Gogh
Fat Over Lean

One of the fundamental concepts of oil painting. Fat oil paint is oil paint coming straight from the tube. When mixed in oil, it becomes even fatter and increases the length of time it takes to dry completely. Lean oil paint is oil mixed with more turpentine than oil, or oil paint mixed with a fast drying oil. Lean oil paint dries faster than fat oil paint.

Lean layer of paint is vulnerable to cracking when the fat layer dries underneath it. Paints underneath a newest layer absorbs oil from the layers above it. Therefore, in building layers, oil paints should be a little fatter than the previous one of of greater proportion of oil in it.

Glazing

This technique produces amazing effects to a painting. Glazing is the application of thin colors over a dried under painting. Usually, a dark color paint over a lighter one.

The secret of glazing is to use extremely thin paint. Sometimes, it takes a lot of glazes to do in building up a color to the proper intensity.

Slowly build your colors and tones. Let the paint dries on each application of layers of paint. In this manner, you can easily wipe off new paints if an error is made. In the event that the applied color is too strong, this can easily be mopped off with a stiff bristled brush without destroying the previous dried layer of paint.

With really thin paint application, the opaque colors will appear translucent, almost like transparent. Use opaque colors on the first glazing layers.

One thing to remember is that glazing may not be applied to the whole painting. You can do glazing in a few objects in your painting just to give more depth to your colors.

Scumbling

This technique is somewhat similar to glazing but done in the opposite manner. It is a thin layer of light opaque paint scumbled over a layer of dried dark paint.The result gives a sense of depth and color variation to an area.

A really thin layer of an opaque paint softens an area of a painting, giving a misty effect or almost out of focus look. This is typically used in background objects. However, too much scumbling with thick opaque paint will result to a flattened sense of depth.

Beams of light is painted with the application of a scumbling technique.This is also useful in creating a glowing effect to accentuate an object.

Alla Prima

Alla Prima or "direct Painting" is a technique of painting directly on the canvas with no under painting. This technique was pioneered by a Flemish painter, Frans Hals.

Painting is usually done in one sitting without waiting for the paint to dry. Most modern painters uses this technique but you have to have a lot of confidence and a quick hand with this method.

Palette Knife Painting

Oil paint application with the use of a palette knife is pretty like much spreading a peanut butter on a bread. This is best for producing textured, impasto effect. Impasto is an application of thick paint (like a toothpaste) to provide a texture on the surface.


Related Article: Oil Painting
Buy Art Materials at The Atelier Art Store


Oil Painting

Oil Painting is a type of paint that is slow  drying. While water is used for aquarelles (watercolor) and acrylics, linseed oil is for oil paints. To increase glossiness of the dried film, a turpentine or white spirit and varnish may be used.

Available at AMAZON.COM
Oil  paints are thick and come in tubes. It usually takes three days  before you can apply another coat or layer because of its slow drying properties. When it dries, new colors can be applied over the painted surface. One thing good about this medium is that you'll have enough time to refine the paint before it dries especially when making gradual transitions from one color to another. If you made a mistake, it can easily be removed by scraping carefully the paint off the canvas with the use of a clean stiff brush, a palette knife or a rag.

The only disadvantage with oil paints that I see is the possibility of cross-contaminating another color when not applied accurately.  Therefore, strokes on the edges of your sketched object must be handled carefully to avoid from getting over to the next wet object you're done painting with as colors may join together.

Mostly, oil paintings are done in canvas but, traditionally, this is made out of linen. Other artists nowadays who are more experimental use different types of fabrics or even marine plywoods prepared and surface applied with a white latex paint. Art stores offer a ready to paint canvas, framed in wood, that comes in different sizes.

Oil Paints vs Acrylics

  • Oil paints have more pigments that allow richer and vivid colors.  Acrylics lightly darkens as they dry but oil paints do not.
  • Oil paints are of slow drying properties while acrylics with quick drying.
  • Oil paints are used with a linseed oil, water for acrylics.
  • Turpentines or Mineral spirits are used for cleaning brushes with oil while Acrylics with water.
  • Oil paints are quite expensive compared to Acrylics, at least, depending on the brand being used.

Which is the right one for you?

This really depends on you. If you are a slow painter, I would recommend using Oil paints or if you are a quick one, Acrylics are best for you. It doesn't really matter which one so long as you are comfortable with your chosen medium. You may use cheaper ones for practice.

Oil paints may be expensive for beginners, however, you'll have fun practicing with color blending and transitioning. More or less, the principles are the same with any other mediums but with Oil paints, you'll just have more time to correct and adjust the paint of an object you are working on. 

I have tried using different mediums but I enjoyed practicing with Oil paints when I was just starting. I can leave my project anytime and resume painting at a more convenient time.

Getting started

You can directly draw on canvas but may find it difficult with its texture when pencil or charcoal is used. You can also prepare your drawing on a large sheet of tracing paper and transfer it to the canvas. You can do this by smudging your pencil or charcoal at the back of your paper, place the paper on top of the canvas and trace the lines of your drawing. You may lose your sketches on canvas in the process, therefore, it is advisable to seal your drawing with a fixative before you start applying Oil paints.

Another method when drawing straight on canvas is to use paints that's thinned with a thinner. Because it is a paint you are using, it does not need to be isolated from subsequent colors.


Buy Art Materials at The Atelier Art Store


    Saturday, July 30, 2011

    Acrylic Painting Tips for Beginners

    Buy this at AMAZON.COM
    Here are a few tips to help you with Acrylic Painting as your chosen art medium.

    Tip 1: Since acrylic paints dry so fast, use only a little paint by squeezing just enough from the tube.

    Tip 2: You can avoid making blotches by always keeping a piece of paper towel next to your water. Get into the habit of wiping your brush after rinsing.

    Tip 3: Dilute acrylic paints with more water if you want it transparent. For opaque - use little water or mix it with white.

    Tip 4:  Use a thin layer of application for glazing.

    Tip 5: Use a thick layer of application to produce a glossy surface.

    Tip 6: A synthetic substance that can be bought in art stores can be used to help increase the flow of a color with minimal loss of its strength instead of just using water.

    Tip 7: You need to work on quickly with blending the colors because the paint dries fast.

    Tip 8: You may use a masking tape to set your margins on all sides. You can also use a masking tape over a dried acrylic paint on the surface without damaging the painted surface. Ensure that the edges of the tape are stuck down firmly to have a clean detail of a certain area you are working on.

    Tip 9: To reduce cleaning time, use a cling wrap over a mixing palette for mixing the colors. No need to clean, simply throw the used cling wrap away if you are done and replace it with an another piece of cling wrap for the next colors to mix.

    Tip 10:  You can also use a cling wrap to cover a paint mixture and keep it damp while you need to do something important in between your painting session.

    Tip 11: Always have a jug of clean water near you. A container of water with soap to clean and remove the paint and another container with water for rinsing. Make sure to wipe the brush clean. If you don't have time to clean the brush right away, soak the used brush with paint in water. Never ever leave your brush uncleaned. The paints will stick to the bristles.

    Tip 12: Make it a habit to clean all your brushes after a day's session.

    Tip 13: Add an impasto gel if you want to create a texture on your painting without having much to use your acrylic paints. This is like an extender that allows you to cover large surfaces or create a textured depth.

    Tip 14: You can use a gel retarder to slow down the drying properties of the acrylic paint. This is really very helpful if you need more time working in the process.


    Refer to Acrylic Painting for Painting Techniques.

    Saturday, July 23, 2011

    Acrylic Painting

    In so many ways Acrylic is very similar to Oil paint. This medium is easier to use and cheap as well. A perfect medium for beginners.

    FEATURES

    • Acrylic paint is opaque when undiluted. A color can be painted over another color without showing through. A black paint can be painted over white without showing the former.
    • Quick drying properties. An additive known as retardants can be added if you want to slow down the drying process. The drawback though would be the reduction of the adhesive properties of the paint.
    • Water-based. Brushes are easily cleaned. Paint can be diluted with water to make it go further and transparent. Therefore, it can be used like watercolor.
    • Waterproof. Once dry it becomes waterproof.
    • Dries flat. No thick layer build ups like oil paints. If you prefer a lumpy painting, a special additive can be used which will make the paint thicker that allows you to create special effects.
    • Hue darkens when the paint dries. Take this into consideration when mixing colors.

    GETTING OFF ACRYLIC PAINTS

    For hard shiny surfaces like glass or metal, this type of paint can easily be removed by scratching or peeling.
    Paint is water soluble, therefore, getting it off from clothes and fabric is very difficult.  Once it dries, it's almost impossible to remove completely. It sticks so well to the fabric. This can also be used for painting designs on T-shirts.

    MATERIALS TO USE

    • Can be used on just about any surface. It adheres best to a surface with a slight texture to it.
    • Canvas and textured papers are the best but you can paint directly onto hardboard or even walls.
    • A palette is recommended.
    • Acrylic brush. This have stiffer bristles. Synthetic bristles are used rather natural hair.


    TECHNIQUES

    Mixing: A good rule is always add a dark color to a light one; a little at a time until the desired result is achieved.

    Base Layer: It is a good practice to apply a base layer of one color onto which all other colors are added. Reason for this is because acrylic paint spreads better on top of a base layer than on top of the paper. This will give you more control as you add succeeding colors. Next is reason is you can leave gaps in the paint and let the base layer show in places. A good way of putting shading effects onto an object is with a dark base layer.

    Since acrylics are opaque, it is easier to paint light colors on a dark background rather than the other way around. It is one of the reasons why a lot of artists  uses black as the base layer;  which has become quite a popular choice.

    APPLICATION

    It's recommended to use plenty of paint on a wide brush and not much water. For narrow strokes,  side of the brush is used. Always clean the brush before proceeding to the next color. Never ever leave a brush lying with a paint on it while you work on another brush because when it dries up it will ruin the bristles. If you haven't time to clean, just immerse it into water until you are ready to clean it. Clean brush with a little soap in warm water. Do not use a detergent.

    Blending: Shading effects can be simulated using blobs of different colors  but the best way to produce good shading is to blend the paint. Mix paint as you would on any other type of mediums  from one color to another. You need to paint quickly before the paint dries. You can create shading effects using different colors. If you are quick enough, you can even mix the paint directly on the painting or surface. This can only be done before the paint dries, therefore, it is very crucial to be quick before drying overcomes you.

    Glazing: A pale color mixture that is very much diluted can almost be completely transparent. Paint it over the dry paint. This can be  repeated a soften as necessary. This will make the glaze look stronger each time a layer is added.

    Scumbling. A completely dry brush is used to apply a very thin uneven layer of paint on top of another color. This will give a blotchy effect.

    Speckling. A toothbrush can be used to sprinkle over the surface that can produce small dots onto the paper as a speckled effect.


    Saturday, July 2, 2011

    Painting Skies and Clouds in Watercolor


    At a glance, painting blue skies for starters seem to be an impossible task. Questions like where to start, how to start and how to blend are the most common thoughts that would run in the mind of an aspiring artist who has never before tried painting skies. I share the same big question marks when I was barely starting landscape painting. Initially, I have much apprehensions because of that large area I have to work on in the paper or in canvas with a brush. I guess, the next question that comes to your mind would be the same question I had - What if drying of paint would overcome my speed of execution? Endless questions. Bottom line is the fear of trying because of what's at stake. Materials are quite expensive. Even the what you call cheap art materials are not really cheap. Not to mention the frustration of not achieving what you expect on the first try. That can be very demotivating. But believe me, most artists had to try several times by doing studies of their chosen subjects.  Lucky are those in this generation as they have several avenues to take in the research  of the different  tips and techniques available both in print and the net. Artists from all walks of life had already done their studies ahead of this generation. With the availability of tutorial references around you, you could start banking on with patience. That's all there is to it. Lots of patience. Most often, several attempts are necessary before achieving the desired results. Practice always makes it perfect.

    To start off, know what art medium you want to use. Different mediums have different approach to painting execution. For instance, painting with the use of watercolor as an  art medium is different with how you would with oil or acrylic paint or any art paint for that matter as they all have different properties. Therefore, each medium should be treated differently.

    WATERCOLOR AS THE MEDIUM

    The most common technique used in watercolor is the flatwash. This technique is usually used to cover large areas in the surface. Another application that is useful in painting blue skies  is the graded wash and  wet-in-wet technique.

    CLEAR SKY


    I. Graded Sky

    Flat and graded wash technique is useful on a clear sky with a few clouds.

    1. Sketch your horizon based on your landscape subject. What separates the land from the sky? Does your horizon lined with mountains or trees? Or a sea? You have to make sure that whatever you see must be already plotted accordingly on your paper.

    2. Prepare your other working materials. Since you are working on with the use of a watercolor, everything must be within reach for easy access. Don't forget to have a roll of toilet paper for dabbing your brush to remove excess water from it. A water filled container for cleaning your brush is likewise necessary. Also, prepare your paint mixture ahead of time.

    3. With the flatwash technique, wet the area by applying water on the surface of your paper.

    4. Mix more than enough of the needed color in your palette. Your mixture of that color should depend on what type of color it is you see on your subject. Mixture should be as nearest to the the color  as you see it. This is important because the color of the sky depends on the time of day and weather. You see a vibrant blue on a perfect day and a darker blue on a rainy day.

    5. Observe your subject. Tilt the paper and start the application with a flat wash.  On the part where you notice the transition from darker hue  to light, start using the graded wash technique by diluting your color mixture with ample amount of water as you bring down your application nearer the horizon. Add more water to the mixture to lighten it. If you are not satisfied with your initial application, you may have to wait for the paint to dry up a bit and repeat the process. Before reapplying, make sure that the surface is just about to  dry otherwise your application may run down on its own. You may, again, repeat the process as you deem fit.

    II. Using wet-in- wet technique on clouds

    6. If you think you are ready to put in the clouds, on the somewhat wet area, blend in the white mixture on the surface where the clouds should be at. Blend the white mixture on some previously applied blue the way it should be. I would use a cotton ball with pure  white paint  and slightly dab it on the surface to make the result more realistic. You can repeat doing this until satisfied. This part need not be as exactly the way you see on your subject model. Clouds are not static because the wind up there changes its appearance. The objective here is just to arrange the clouds as realistically as you can. 

    VARIEGATED SKY


    You'll know the sky is variegated when you see other colors especially in sunrise and sunset settings. Flat and graded wash won't work in this situation unless it's calm or still. In situation where there are lots of motion going on up there, the wet-in-wet technique is most useful and convenient.

    1. Observe your subject model. Take note of the different hues of each color you see. Know how many colors you need to prepare. Notice the arrangement of the clouds. Know when you are ready.

    2. Create the almost exact  mixture of paints that cover the large area of your subject. Prepare the other color mixture  as well.  Dampen your paper evenly  with clean water.

    3. Start applying the paint mixture that dominates the sky with horizontal strokes bringing it down depending on how far it should go until the transition should take place.

    4. In transitioning, blend in the next color mixture while previous application is wet. Continue with your strokes until it brings you to the next color. With a clean brush blend in  the next  mixture of colors  well especially on parts that should have a smooth transition, that is  if you want to depict a calm or still sky.

    5. For clouds depicting motion, you may use a cotton ball instead of your brush in blending the colors. Dab it lightly on the surface to avoid abrupt smudges as this might make your painting look dirty.

    6. Correct abrupt color transition by going over to that area with the mixture of paint you are last working on.


    Tuesday, June 21, 2011

    Still Life Painting

    Paul Gauguin, Still Life with Apples, 


    If you are stuck with what to draw or paint, I would recommend still life for beginners. Still life is an artwork depicting inanimate objects. These are things that do not have a life. Anything around you that's sitting somewhere and does not move is still life.

    If you feel you are not ready for something bigger, start painting objects in still life. This is a good way to practice with the art medium you have chosen and learn more in creating different textures. It is like getting the hang of everything. It is also one way of working out those fingers and how you handle your painting materials. Start your painting project with two objects of your choice. You can probably start with one tall object and the other one small, let us say, a fruit. Select something that is simple in shape. After all, you are just starting. It does not have to be rich in detail as this is going to be a lot of effort for starters. Now, the challenge lies in your choice of composition. Why? Because you will not only focus on the two objects but also with the negative space. You may be thinking what a negative space is. A negative space is the space between two objects and around it. The opposite of the negative space is positive space which is the area of your subject itself. So now, you get the picture? Apart from your subject, it is important to also give life to the areas surrounding it. Therefore, you have three main considerations; namely: the negative space, the shadows and the different tones in the background. That's all there is to it.

    The great way to set up your still life is, of course, somewhere near you and on the right height of your view point. In this way, you wouldn't have to bend or move every time just to get a good view of your object. It should be very convenient to your sight.


    Friday, June 10, 2011

    Pastels


    Art work in Pastel by Edgar Degas


    Here is one medium you can use if you just want to paint and draw at the same time without having much to spend a lot of money especially if you are just starting. This is a practical choice because it is cheaper and more convenient compared to other mediums. You can easily have your images on a paper with these chalky pigments with no need of brushes and solvents. Moreover, there's no need to wait for the paints to dry. Basically, there are three types of pastels available in the market. Those that are soft or hard are the most commonly available kinds. Pastel pencils are similar to hard pastels.

    TECHNIQUES

    Draw your subject. Use hard pastels or semi soft pastels for large areas in your drawing. Apply medium pressure. Cover up said areas as much as you can with bold strokes. Deal with the details later. Start from dark tones to middle tones, add the light tones later. It's kind of challenging to get the dark tones really dark. You must apply them solidly at the start and be not afraid to make them too dark because that can always be lightened by applying another color on top. Constantly remove pigments by tapping the surface. This is one way of checking the paper for any surfaces that need more attention. Blend the colors only when necessary as you work building the layers. Use your artistic judgement when to blend or not to blend. The use of a paper stump can be used for blending or your fingers! I personally prefer the latter as it gives me more control. You may apply a fixative to protect your painting from smudging. Please take note though that fixative tends to darken and dull the colors.

    TEXTURES

    Feathering is a frequently used pastel technique. This is similar to hatching or crosss hatching. You apply a series of thin parallel lines of one color drawn diagonally on top of the other. This can be done with both hard and soft pastels. Blending is achieved by the use of the hand or even a brush. Gradation in pastels is blending colors from light tone towrds a darker shade. Glazing by scumbling with pastels is done by lightly dragging the broad side of a soft pastel over the existing layers underneath. This is an application of a light color over dark. Pointillism requires a lot of effort. This can be applied by creating small dots all over the surface. Colors though must be carefully chosen to get the required depth in the painting.

    Practice these basic textures and see what works for you. Try to experiment your own techniques. You will find your distinctive style as you become more experienced. You may vary the textures to add some personality to your paintings. Don't be scared to try and experiment. Remember, great artists were not trained formally.

    TIPS

    Get your supplies ready before immersing yourself to painting. Have a paper ready at the bottom of your painting to catch those dust. This will keep the pastel dust under control. Cover the floor with a cloth. When done, you can take it outside to shake the dust out.

    MAXIMIZE IMPACT

    It is essential to know that using the correct paper can give outstanding effect to your paintings. Given that pastels are of light powdery pigment it is necessary to use a paper with a rough texture or surface because of its ability to grip the dry pigments.

    For starters, I recommend the following:

    Strathmore papers
    Canson Mi-Teintes paper
    Fabriano Ingres paper
    Sanded pastel papers - my favorite!


    Saturday, April 30, 2011

    Landscape Painting

    Every person have something about an awesome landscape that makes one go wow. We all have that feeling especially if it's our first time to see a place with so much to offer like beaches, resorts, mountains, falls - anything and everything about nature.  For a person with a creative mind and an eye for the arts would just have an itchy finger to capture its essence on canvas. For beginners, here are some tips that will help you on how to go about it.


    It may seem that you'd want to paint every inch of what you see around you. That's pretty huge to bring it all in your canvas, paper or board or whatever material or medium you intend to use. It would be best not to put everything in. Though it's all there right in front of you, you are not obliged to include everything you see. I would normally scan the area, get a spot that I find interesting the most and capture it with a camera then I print the picture on paper using my favorite medium.

    Let your creative mind use your imagination. This should be a part of your painting planning. You don't just grab your materials and start doing it. Careful planning consideration is essential to be spontaneous with your painting. Do not hesitate to rearrange the elements in the landcape. You may want to take things from different landscapes and put them together in one painting. Or you may want to add something to make your landcape more interesting. 

    Give special preference to the foreground. You don't paint the whole landscape with same degree of details. That can't be possible because even your own eye sight can only see so much depending on the distance of each object from your view. Give authority to what's more visible and that would be your foreground. Thus, its background should be less in detail. The difference in detail also helps draw the viewer's eye main focus of the landscape painting.

    It is always a good practice to mix and experiment colors rather than painting straight from ready mixed paints in tube. Most artists would create their own mixture to give their painting a unique approach to their subjects. Do not be hesitant to do this. Greens usually dominate a landscape. Therefore, learn how to mix your greens well. There are a variety  of intensities of greens that occur in nature. You may or may not see it but there are, in fact, either a blue or yellow in these greens. It is important to take note that the color also changes depending on the time of day. 


    Sunday, April 24, 2011

    Trees and Foliage in Watercolor

    Painting trees and foliage are treated differently as you don't actually paint it in detail. Well, it depends though on how near you are on the subject. The nearer the subject is, the more detailed your subject should be. Not much details are needed for landscape painting. We show the depths through different mixture of paints from the lightest to the darkest hue. Painting these type of subjects are quite a challenge but with basic knowledge you'd overcome your struggles.

    Though watercolor set comes in variety of colors, I advise you not to use the paint straight from its tube. Best results will be obtained if you experiment mixing the paints and creating your own mixture. It is therefore crucial that you study and scrutinize your subject well in terms of the color you see. At a distance, you cannot possibly see the leaves and branches. They are just different shades of green. You only see the details if you are standing close to them. Either you paint from a picture or what you see around you, same basic rules apply for painting trees and foliage. Please take note that the same goes for bushes whether trimmed or not.

    To start off, let's work on the highlight first. Use lemon yellow or a vivid green. Mix a sufficient amount of this mixture as you will be using the same all through out; adding other related colors to it as you progress with your subject. Depending on the kind of tree you are working on, try to leave a speck of white areas for sky holes. Wet on wet technique is recommended on the initial stages of your work. Next, add a vivid green into your previous mixture and apply it on the wet area to create the foliage effect of the tree. Different brush strokes are needed for depicting appropriate textures on the paper or board. Before it completely dries, add more sap green into your mixture and apply the paint on the bottom part of your tree to create shadows.

    Now, moving towards the darkest area, mix a cobalt blue (if you have it in your palette) or just plain blue/ aquamarine on the same mixture and create varying strokes on the dark areas, wet on wet, to show depth. For finishing, let your painting dry completely and wash your brush well. Dry technique will be used on the final stages and to complete your subject. Add indigo or violet and some browns into the mixture and dab on some areas of the bottom part to create shadows. Clean your brush , dip its tip in clean water and soften the edges of some of your last application  to avoid distinctive marks. Wait a few minutes to totally dry up the surface and you may start working on the bark of the tree. Make sure to use different shades of brown to show the texture and some shadows of the bark.


    Water Color Painting: Practice 2

    STILL WATER

    As previously mentioned, it is important that you study your subject well. If you are painting from a picture, you must look at it closely and observe the different tones you see. Some objects may look the same at a first glance but if you will let your eyes focus on an object, you will see the different tones I am talking about.

    For this painting, several techniques were used. Wet in wet technique was used  in trees, foliage and grass; while flat and graded wash for the sky and the reflection on the pond. The grass near the water were glazed with a light yellowish pigment. Before you begin painting, lay out you drawing as your guide. 

    TREE, FOLIAGE, GRASS. Depending on what you see in your subject, identify the type of green you see. Create a light mixture and apply it on the object using a flat wash. This will be your highlight. Let it dry a bit. On the same mixture, add another paint to make it darker than the initial mixture. Apply in irregular brush pattern. Repeat the process with the mixture; making it darker in shade for the shadows. Do not use the paint straight from the tube. For a realistic effect, you can try to create mixtures of green, yellow, some brown, some blue to darken the color that will be used for the shadow. Make sure that all mixtures will be based on what you see on your subject. It may not be the exact color but should be something closer, at least. Always have another paper ready to try the colors first before application.


    REFLECTION. Draw a line connecting the eye to the water and measure the angle created between the water and the line. Use this same angle to connect the top of the item being reflected with the water. Where the line hits the water, this is the top of the object's reflection. Make paint mixture thin and transparent, keeping in mind that the actual color of the water should be the dominant hue. Paint the water over the reflection. It should be a thin wash that would allow the reflection to show clearly through. Add more water to thin out the mixture or use lighter colors. For the wet method, paint the water in first. While the water is still wet, add in the reflection. Instead of using stripes, fill the brush with the desired color and create lines. Allow the paint to run and bleed into the wet color of the water you already applied. The reflection will distort automatically as it mixes with the wet paint. 


    Saturday, April 16, 2011

    Watercolor Painting: Practice 1

    RUNNING WATER

    Before you start painting it is always good to make preparations. Do some drawings and practice the difficult pieces; make tonal studies of the colors you are going to use - this means different tones of just one color. You also need to study your subject. Visualize it well. If you are going to paint from a picture, make sure to study the details well and observe the colors you see.

    It is imperative to execute your painting with confidence. Starting a project can be daunting for beginners..Doubts that you can do it can wither your confidence. Do not allow this to happen. Always be in a relaxed mood.

    Start with sketching your subject as they define shapes for you. We know for a fact that there are different variety types of water, each with its unique characteristics. Rivers, lakes, falls, puddles and oceans have their own attitude. Therefore, it is important that you are aware of their movements.


    One of the basic painting techniques is to start with the darkest areas and use a darker shade than the rest of your depths. It may look uninteresting at first but as you progress you would be able to blend the different depths that would add realism to your painting.


    When you begin painting water, you would also want to start with the darkest areas. Continue to paint with different depths, gradually move towards the lighter shade as you work your way into the shallow areas. In this illustration, a some sort of turbulence needs to be expressed because of the different levels of the water bed.

    Title: Mambukal

    Of course, the result of your painting would greatly depend on the materials you use. If your painting turns out to be not as good as you expect it would be, do not tear it! Treat it with respect. The majority have to learn by trial and error.


    A little imagination can have a great deal of fun and pleasure as you learn to paint with watercolor.


    Sunday, April 10, 2011

    Watercolor Painting III

    OTHER TECHNIQUES COMMONLY USED

    GLAZING TECHNIQUE:   This technique is an application of a transparent color (more of water than paint mixture) over a completely dry layer of color that gives an interesting blend of new color. This is done with a soft brush and not much pressure on the surface.

    WET IN WET TECHNIQUE:- This technique is an application of wet (water) wash over a surface. This is done by evenly apply a wet brush with water by using the flat wash technique over the surface. Any excess water must be absorbed by a clean sponge or tissue paper. The trick here is just to have the surface evenly saturated before applying watercolor.

    DRY BRUSH TECHNIQUE This technique is an application that uses a fairly dry pigment and little water mixture. This is usually used for adding the essential details on your subject. It focuses on the outlines of an object e.g. hair, eyes, grains and probably textures  for a more realistic approach on your subject.  Most artists would use a variety of watercolor brush techniques in a single painting for a much more interesting effect.

    Do not limit yourself on the techniques that are cited here. You can use other techniques you would want to try - be creative as you can be!


    CORRECTING MISTAKES
    • Wet the area that needs to be removed with a clean sponge and absorb the color with a tissue.
    • If the color does not come off, apply water carefully with a brush and let it soak a bit longer to soften the paint before attempting to clean it with a sponge.
    • If you are still unable to remove the color, damp the area with a bristled-brush and gently scrub it. You have to do this with utmost care to prevent the risk of damaging the surface of the paper.
    As a note, watercolors can give gorgeous translucent effects on your subject. However, this medium is a lot more difficult to manage that other types of media such as acrylic and oil paint. It is quite difficult to hide a mistake with another layer of paint mixture. Therefore, a little planning is needed before you start doing painting.

    TIPS FOR BEGINNERS

    As an initial step, use a sketch pad for your preliminary composition. Draw your subject with its basic shape that will serve as your guideline. Your center of interest or what we call the focal point must not placed in the center of the painting to give it a more interesting piece. Some areas should be more detailed than the others. After the preliminaries, the following must be taken into consideration:
    • Check the light source.
    • Decide and mark areas for highlights, medium tones and where shadows should fall.
    • Consider wash technique to use.
    • What wash to be applied first, second and so on.
    • Areas to leave blank.
    Do not despair if you feel disappointed with your first piece. That can happen to anyone and even with professionals for that matter! Always move on to the next masterpiece and look forward to another exciting experience. Always take your time and enjoy each and every stroke. Put your heart into it. Do not rush. Keep every piece you have accomplished for comparison. You will surely notice your progress. Remember, every stroke you make is time well spent!


    Saturday, April 9, 2011

    Watercolor Painting II

    TECHNIQUE 2: GRADED WASH

    This is the second basic wash skill. This technique is a smooth transition in value from dark to light. This is somewhat similar to flat wash except that its application starts with a dark value and transitions with a lighter paint or just water to decrease the intensity of the color.

    Instructions:
    • Draw a 2" x  3" rectangle on your board.
    • Pick a color of your choice and mix a liberal amount of medium intensity with a little water. Mix well and charge your brush with it and start the application from left pulling a straight line of paint across the edge of the rectangle. Repeat the process until the middle half of the area you are working on. Lightly dab your brush on a sponge or tissue paper and dip the tip of your brush in the water and continue working on the previous stroke; overlapping it. This would automatically blend the color with water. Repeat the process all through out the bottom. 


    • It is alright to reapply and do a second coating to correct uneven strokes. Make sure to dry well before reapplication.

    I did a second application here.

    A third and final application to smoothen the transition.

    • It really takes practice to perfect your wash. Experiment with different colors and intensities. You may try with one color to another for interesting multi-color effects. You can also practice this technique with some basic shapes like the sample rendering below. 

    Graded wash used in rendering a cone.


    Flat wash used in rendering a slab.

    Note: Do not forget the light and shadow lesson I taught you in the previous lessons. No matter what medium you decide to use in the future, you always need to consider your light source.

    Tuesday, April 5, 2011

    My Gallery

    Title: Chillies
    Medium: Charcoal and Colored Pencils on Paper


    Title: Penguins
    Medium: Oil on Canvas


    Title: Kumpuni

    Medium: Poster Color on Board


    Title: Rabbi
    Medium: Sepia


    Title: Bamboo
    Medium: Colored Pencils on Paper


    Title: Sunset
    Medium: Pencil on Paper


    Title: Hot Air Balloon

    Medium: Pencil &Colored Pencils on Paper


    /

    MY BLOG LIST